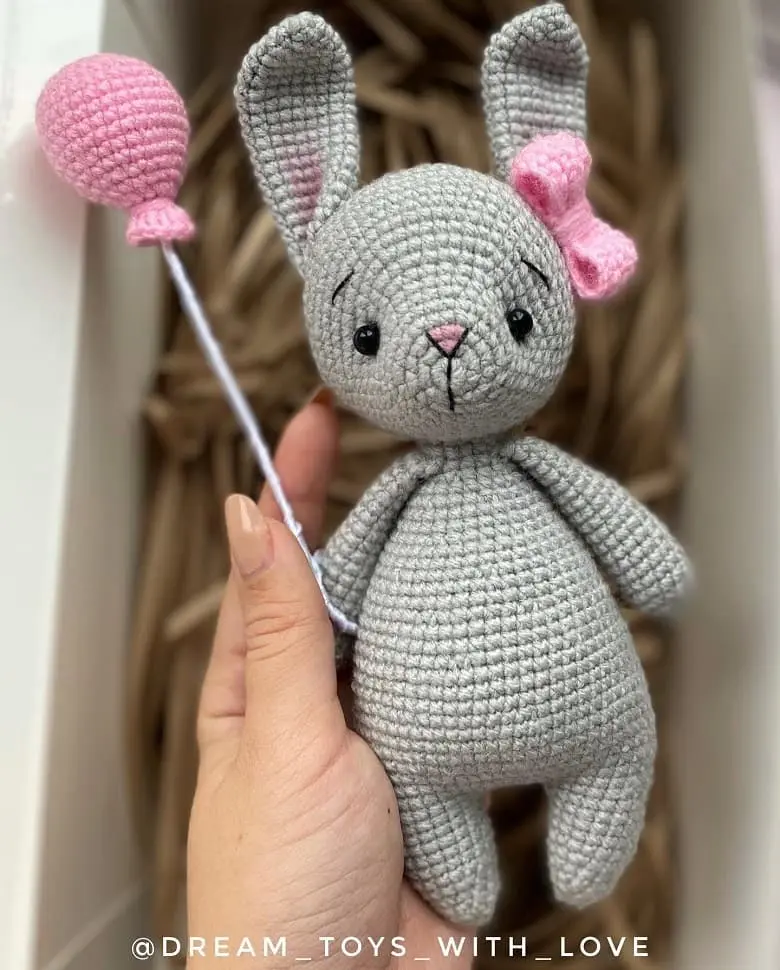
Here is Lily, the bunny girl amigurumi pattern with her balloon included. The legs and body of the amigurumi bunny are made as one piece. The tail and arms are attached with single crochet as you crochet the body, the head and ears are separate pieces. The finished toy size will depend on your tension and the materials used.
Designed and photos by @juju.toys_
Translated by Amiguroom Toys
Materials:
- Yarn: YarnArt Baby (100% acrylic, 50 g/150 m): grey #195 (less than one skein), pink #217 for a bow and balloon
- Hook size: 2.0 mm
- Black thread for embroidering a nose and eyebrows
- 5 mm black beads for eyes
- Wire for a balloon (20 cm long)
- White ribbon for wrapping the wire
- Glue
- Needle for sewing on details
- Pink pastel crayon for a nose and ears
- Stitch marker
- Fiberfill
Abbreviations:
R = row
mc = magic circle (magic ring)
ch = chain
st = stitch
sl st = slip stitch
sc = single crochet
dc = double crochet
inc = 2 sc in the next stitch
dec = single crochet 2 stitches together
F. o. = finish off
(12) = number of stitches you should have at the end of the round/row
(…)* 6 = repeat whatever is between the brackets the number of times stated
Free amigurumi bunny with a balloon pattern
Arms (make 2)
R 1: 6 sc in mc (6)
R 2: (inc)* 6 (12)
R 3: (3 sc, inc)* 3 (15)
R 4-19: 15 sc (16 rows)
Fold the top opening flat and 7 sc through both sides across.
F. o.
Tail
R 1: 5 sc in mc (5)
R 2: (inc)* 5(10)
R 3: 10 sc
Fold the top opening flat and 5 sc through both sides across.
F. o.
Legs and body (one piece)
Legs (make 2)
R 1: 6 sc in mc (6)
R 2: (1 sc, inc)* 3 (9)
R 3: (2 sc, inc)* 3 (12)
R 4: 12 sc
R 5: (3 sc, inc)* 3 (15)
R 6: (4 sc, inc)* 3 (18)
R 7-10: 18 sc (4 rows)
F. o.
Don’t cut the yarn when you’ll finish the second leg!
From the second leg: 6 ch, join with the first leg.
Continue crocheting the body in the round:
Body
R 11: 18 sc on the first leg, 6 sc in 6 ch, 18 sc on the second leg, 6 sc sc in 6 ch (opposite side) (54)
Place a stitch marker at the beginning of the row.
R 12: 8 sc, inc, 12 sc, inc, 12 sc, inc, 10 sc, inc, 2 sc (52)
R 13: 52 sc
R 14: 10 sc, inc,12 sc, inc, 12 sc, inc, 12 sc, inc, 2 sc (56)
R 15-16: 56 sc (2 rows)
In the next row we will crochet the tail into the body (crochet sc of the tail and sc of the body together).
R 17: (7 sc, inc)* 7 (63)
R 18-20: 63 sc (3 rows)
R 21: (7 sc, dec)* 7 (56)
R 22-24: 56 sc (3 rows)
R 25: (6 sc, dec)* 7 (49)
R 26-27: 49 sc (2 rows)
R 28: (5 sc, dec)* 7 (42)
R 29-30: 42 sc (2 rows)
R 31: (5 sc, dec)* 6 (36)
R 32-33: 36 sc (2 rows)
R 34: (4 sc, dec)* 6 (30)
R 35-36: 30 sc (2 rows)
R 37: (3 sc, dec)* 6 (24)
R 38: 24 sc
R 39: (2 sc, dec)* 6 (18)
In the next row we will crochet the arms into the body.
R 40: 18 sc (crochet sc of the arm and sc of the body together).
R 41: 18 sc
F. o. and leave a long tail for sewing.
Ears (make 2)
R 1: 6 sc in mc (6)
R 2: (1 sc, inc)* 3 (9)
R 3: (2 sc, inc)* 3 (12)
R 4: (3 sc, inc)* 3 (15)
R 5: (4 sc, inc)* 3 (18)
R 6-20: 18 sc (15 rows)
Fold the top opening flat and 8 sc through both sides across.
Fold the ear in half and 3 sc through both sides across.
F. o. and leave a long tail for sewing.
Head
R 1: 6 sc in mc (6)
R 2: (inc)* 6 (12)
R 3: (1 sc, inc)* 6 (18)
R 4: (2 sc, inc)* 6 (24)
R 5: 24 sc
R 6: (3 sc, inc)* 6 (30)
R 7: 30 sc
R 8: (4 sc, inc)* 6 (36)
R 9: 12 sc, (1 sc, inc)* 6, 12 sc (42)
R 10: (6 sc, inc)* 6 (48)
R 11: 48 sc
R 12: (7 sc, inc)* 6 (54)
R 13: 54 sc
R 14: (8 sc, inc)* 6 (60)
R 15: (9 sc, inc)* 6 (66)
R 16-18: 66 sc (3 rows)
R 19: (9 sc, dec)* 6 (60)
R 20: (8 sc, dec)* 6 (54)
R 21: (7 sc, dec)* 6 (48)
R 22: (6 sc, dec)* 6 (42)
R 23: (5 sc, dec)* 6 (36)
R 24: (4 sc, dec)* 6 (30)
R 25: (3 sc, dec)* 6 (24)
R 26: (2 sc, dec)* 6 (18)
R 27: (1 sc, dec)* 6 (12)
R 28: (dec)* 6 (6)
F. o.
Make eye tightening.
Sew the eyes between R 8 and R 9 at the distance of 12 stitches from each other.
Assembly
Using a black thread, embroider a nose in R 3-4 as shown in the picture.
Tint the nose with a pink pastel crayon.
Embroider eyebrows three rows above the eyes with black thread.
Sew the head to the body, the ears to the head.
Tint the ears with the pink pastel crayon as shown in the picture.
Free crochet bow and balloon pattern

Bow
With pink yarn:
Work in turning rows.
Make 27 ch.
R 1: From the 2nd ch from hook: 26 sc, 1 turning chain (26)
R 2-4: 26 sc, 1 turning chain (3 rows)
Fold the bow with the right side inside and crochet sl st along.
F. o. and leave a very long tail to wrap the middle of the bow a couple of times.
Sew the bow to the ear.
Balloon
Take a piece of wire 20 cm long. Bend the wire at the top to insert it into the balloon. Then we make a loop at the bottom of the wire to put it on the hand. Using glue, wrap the wire with a white ribbon or thread.

With pink yarn:
R 1: 6 sc in mc (6)
R 2: (inc)* 6 (12)
R 3: (1 sc, inc)* 6 (18)
R 4: (2 sc, inc)* 6 (24)
R 5: (3 sc, inc)* 6 (30)
R 6-10: 30 sc (5 rows)
R 11: (3 sc, dec)* 6 (24)
R 12: 24 sc
R 13: (2 sc, dec)* 6 (18)
R 14: 18 sc
Stuff a little with fiberfill.
We apply glue to the top end of the wire and insert it into the balloon.
Add fiberfill stuffing immediately.
R 15: (1 sc, dec)* 6 (12)
R 16: 12 sc
R 17: (dec)* 6 (6)
R 18: 2 ch, (2 dc in one st)* 6 (12)
F. o.
