Designer : Lizette By
Instagram: virkatbyby
Hello everyone who loves amigurumi…
Today I shared the amigurumi cat crochet pattern for you. Below you will find a step-by-step tutorial of this pattern and you will complete it without any difficulty. Thanks to the creator for this cute pattern.

Amigurumi cats, amigurumi dolls, amigurumi dogs, amigurumi unicorns, amigurumi lambs, amigurumi dinosaurs, amigurumi foxes, amigurumi bears, amigurumi giraffes, amigurumi pigs, amigurumi birds, amigurumi bunny, amigurumi elephants, amigurumi hippos, amigurumi monkeys… All the amigurumi toy crochet patterns and ideas you are looking for are here. Have a great time…
Materials
• Cotton yarn 8/8 – approx 3-4 rolls (50g/1,8oz) of green colour yarn and less than 1 roll (50g/1,8oz) of white colour yarn. I use 3 rolls of green crocheting with Scheepjes “Cahlista” (85 meter/roll)
• Yarn for yoga mat: yarn of your choice, I use acrylic yarn “Amigo” from hobbii.se and a 3,5mm crochet hook)
• Cotton yarn 8/4 – black and brown for eyes, nose, paw pads and rope for the yogamat
• Crochet hook – 3,5mm and 2,5mm (when crocheting with yarn 8/4)
• Fiberfill stuffing
• Needle, scissors, stitch marker, and embroidery thread for the whiskers
Abbreviations
MR = magic ring
sc = single crochet
ch= chain
dc = double crochet
sl st = slip stitch
inc = two stitches in same stitch (increase)
dec = two stitches together (decrease)

AMIGURUMI FREE PATTERN – THE YOGI CAT
Head
Yarn; Green
Rnd 1: 6 sc in a MR
Rnd 2: inc x6 (12)
Rnd 3: (1 sc, inc)*6 (18)
Rnd 4: (2 sc, inc)*6 (24)
Rnd 5: (3 sc, inc)*6 (30)
Rnd 6: (4 sc, inc)*6 (36)
Rnd 7: (5 sc, inc)*6 (42)
Rnd 8: (6 sc, inc)*6 (48)
Rnd 9: (7 sc, inc)*6 (54)
Rnd 10: (8 sc, inc)*6 (60)
Rnd 11-20: 60 sc (60, 10R)
Rnd 21: (8 sc, dec)*6 (54)
Rnd 22: (7 sc, dec)*6 (48)
Rnd 23: (6 sc, dec)*6 (42)
Rnd 24: (5 sc, dec)*6 (36)
Rnd 25: (4 sc, dec)*6 (30)
Rnd 26: (3 sc, dec)*6 (24)
Rnd 27: (2 sc, dec)*6 (18)
Finish with a sl st.
Stuff the head with fiberfill and leave a yarn tail for sewing.
Ears (make 2)
Yarn; Green
Rnd 1: 6 sc in a MR
Rnd 2: (2 sc, inc)*2 (8)
Rnd 3: (3 sc, inc)*2 (10)
Rnd 4: (4 sc, inc)*2 (12)
Rnd 5: (5 sc, inc)*2 (14)
Rnd 6: (6 sc, inc)*2 (16)
Rnd 7: (7 sc, inc)*2 (18)
Finish with a sl st.
Leave a yarn tail for sewing.
Cheeks (make 2)
Yarn; White
Rnd 1: 5 sc in a MR
Rnd 2: inc x5 (10)
Rnd 3: (1 sc, inc)*5 (15)
Finish with a sl st.
Leave a yarn tail for sewing.
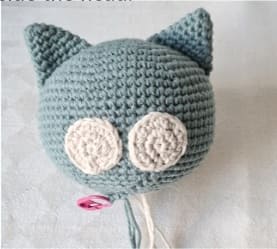
Flatten the ears and sew them on top of the head, start from R3/4.
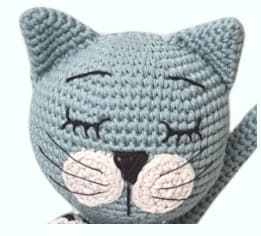
Sew the cheeks on R15/16 to R21. Embroider the whiskers (with embroidery thread), eyes (on R12-13), eyebrows and nose on the head.
Fasten all yarn tails inside the head.
Body
Yarn; Green
Rnd 1. 6 sc in MR
Rnd 2. 6 inc (12)
Rnd 3. (1sc,inc)*6 (18)
Rnd 4. (2sc,inc)*6 (24)
Rnd 5. (3sc,inc)*6 (30)
Rnd 6. (4sc,inc)*6 (36)
Rnd 7. (5sc,inc)*6 (42)
Rnd 8. (6sc,inc)*6 (48)
Rnd 9-17. 48 sc (48) (9 rows)
Rnd 18. (6sc,dec)*6 (42)
Rnd 19-20. 42 sc (42) (2 rows)
Rnd 21. (5sc,dec)*6 (36)
Rnd 22-23. 36 sc (36) (2 rows)
Rnd 24. (4sc,dec)*6 (30)
Rnd 25-26. 30 sc (30) (2 rows)
Rnd 27. (3sc,dec)*6 (24)
Rnd 28-29. 24 sc (24) (2 rows)
Rnd 30. (2sc,dec)*6 (18)
Finish with a sl st.
Stuff the body with fiberfill and leave a yarn tail for sewing.


Belly
Yarn; White
Rnd 1. 6 sc in MR
Rnd 2. 6 inc (12)
Rnd 3. (1sc,inc)*6 (18)
Rnd 4. (2sc,inc)*6 (24)
Rnd 5. (3sc,inc)*6 (30)
Rnd 6. (4sc,inc)*6 (36)
Rnd 7. (5sc,inc)*6 (42)
Finish with a sl st.
Leave a yarn tail for sewing.
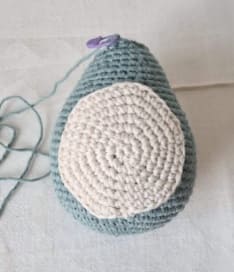
Sew the belly on the body between rnd 8/9 and rnd 24.
Fasten the yarn tails inside the body.
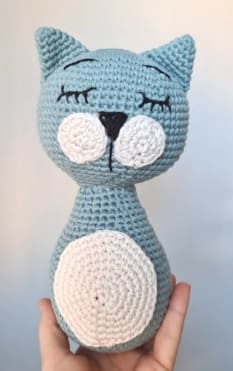
Assemble the head and body together and use more fiberfill if needed.
Legs (make 2)
Start with white colour yarn.
Rnd 1. 6 sc in a MR
Rnd 2. inc x6 (12)
Rnd 3. (1 sc, inc)*6 (18)
Rnd 4. (2 sc, inc)*6 (24)
Rnd 5. 24 sc (24)
Change to green colour yarn.
Rnd 6. 8 sc, dec x6, 4 sc (18)
Rnd 7. 8 sc, dec x3, 4 sc (15)
Start filling the paw and leg and continue as you go. The leg should not be filled too hard.
Rnd 8-57. 15 sc (15, 50Rnd)
Rnd 58. Flatten the end of the leg and crochet through both layers with 7 sc.

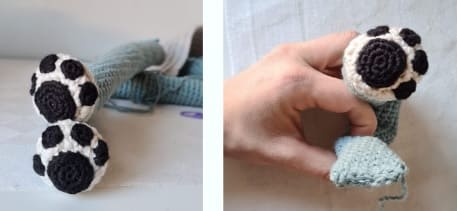
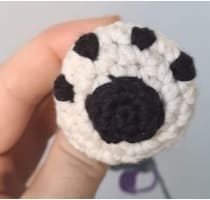
Paw Pads
Black 8/4, 2,5mm hook.
Make 8.
Rnd 1.7 sc in a MR, finish with a sl st in the first sc (7)
Leave a yarn tail for sewing.
Make 2.
Rnd 1. 6 sc in a MR (6)
Rnd 2. inc x6 (12)
Rnd 3. (1 sc, inc)*6 (18)
Finish with a sl st and leave a yarn tail for sewing.
Sew the paw pads on the paws like the picture below, start with the small ones.
Fasten all the yarn tails.
Sew the legs to the body (start on Rnd7) and make sure that they look ok when positioning the legs in yoga position.
Arms (make 2)
Start with white colour yarn.
Rnd 1. 5 sc in a MR
Rnd 2. inc x5 (10)
Rnd 3. (1 sc, inc)*5 (15)
Rnd 4. (2 sc, inc)*5 (20)
Rnd 5. 20 sc (20)
Change to green colour yarn.
Rnd 6. dec x5, 10 sc (15)
Rnd 7. 2 sc, dec, 11 sc (14)
Rnd 8-32. 14 sc, finish with a sl st after the last round (14, 25R)
Start filling the arms after round 10, not too hard.
Rnd 33. Flatten the arm and crochet through both layers with 6 sc.

Leave a yarn tail for sewing.

Paw Pads
Black 8/4, 2,5mm hook.
Make 2.
Rnd 1. 6 sc in a MR
Rnd 2. inc x6, finish with a slst (12)
Leave a yarn tail for sewing. This time, leave a longer yarn tail to embroider the 4 smaller paw pads with.Sew the paw pads on the paws and embroider the 4 smaller paw pads.
Sew the arms to the body so that they are in the position you want, start on R23.
Sew the arms at an angle making the arms point down (see pictures).
Tail
Yarn; Green
Rnd 1. 8 sc in a MR
Rnd 2-46. 8 sc, finish with a sl st after the last round (8, 45R).
Fill the tail with fiberfill as you go.
Flatten the end of the tail and crochet 4 sc through both layers.
Leave a yarn tail and sew the tail on the body on R9/10.

Yoga Mat
Acrylic yarn & crochet hook 3,5mm
Rnd 1. ch 50
Crochet all rows from now in back loops only.
Rnd 2. Starting in 3rd chain from the hook, do 48 dc, ch 3 and turn.
Rnd 3-17. 49 dc in 15 rows, ch 3 and turn
between the rows. After last row finish with a ch instead of ch 3. Fasten the yarn tails.

Yoga Mat Rope
Yarn; Brown
Rnd 1. Ch 80-95, depending on how big your mat is. Fasten off and leave a yarn tail.
1. Put the rope as picture 1.
2. Start with one end of the rope and put it over the yoga mat. After that, put the rope under the rope lying of the table.
3. Use needle and fasten the rope end in 4th sc on the rope end. This makes a small loop around the yoga mat rope.
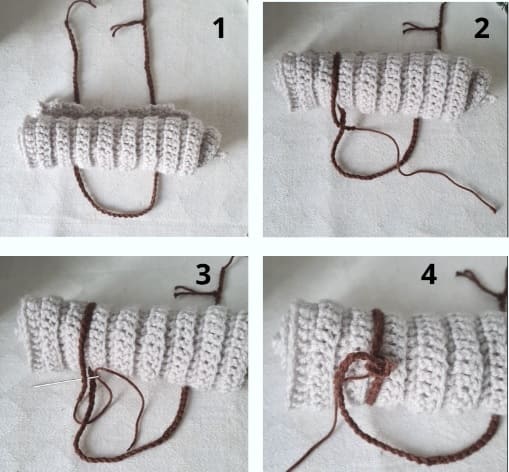
Do the same with the other yarn end.
Fasten the yarn tails.
Congratulations, Your crochet cat yogi is ready!
More amigurumi cat ideas:


