Designer: Teirin Evenstar
Instagram: @teirin_evenstar
Simple, cute, and fun — just how we like it, with a touch of charm…
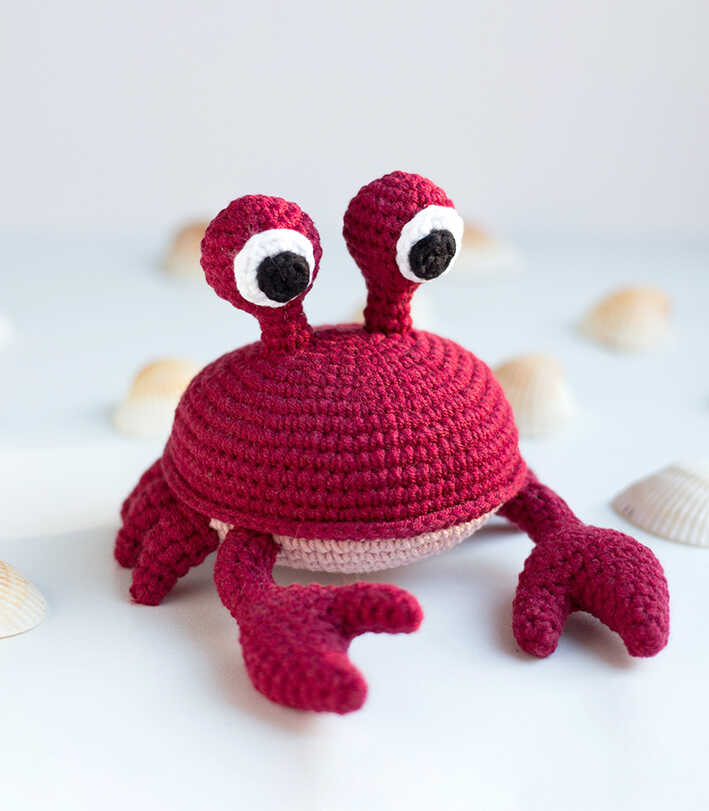
The Crochet Crab Christian Amigurumi Free Pattern, designed by the talented Teirin Evenstar (VK), is a delightful project that brings the charm of the sea right into your crochet collection. This adorable red crab is worked in soft tones of YarnArt Jeans yarn (red, pink or beige-pink, white, and black) using a 2 mm hook, making it both sturdy and cuddly. The crab’s carefully designed eyes add a truly lovely touch, giving it a playful and lifelike expression. With the help of simple tools such as tailor’s pins, a wide-eye needle, and toy filler, you can easily bring this cute marine friend to life.
This pattern is step by step and beginner friendly, making it a perfect choice for both new and experienced crocheters. Whether you want to create a fun sea creature for kids, a summer-inspired decoration, or just a unique handmade gift, this little crab is sure to impress. At the end of the free tutorial, you’ll also find more amigurumi crab ideas to spark your creativity and expand your collection. A big thanks to Teirin Evenstar (YouTube) for sharing this charming design with the crochet community!

Materials and tools:
– YarnArt Jeans: red,
pink (or beige-pink),
white and black colors;
– Hook No. 2;
– Tailor’s pins;
– Wide eye needle;
– Filler for toys.
Abbreviations
MR – Amigurumi Magic ring
sc : Single Crochet
inc : Increase
dec : Decrease
tr : Triple Crochet/ Treble Crochet
st: Stitch
dc : Double Crochet
hdc: Half Double Crochet
sl-st or Slst: Slip Stitch
ch : Chain
tch: Turnin chain crochet
FLO : Crochet into front loops only
BLO : Crochet into back loops only
AMIGURUMI CRAB FREE PATTERN
Head-body:
Upper part (in red yarn):
1) 6 sc in MR [6]
2) 6 inc [12]
3) (1 sc, inc) * 6 times [18]
4) (inc, 2 sc) * 6 times [24]
5) (3 sc, inc) * 6 times [30]
6) 1 sc, inc, (4 sc, inc) * 5 times, 3 sc [36]
7) (5 sc, inc) * 6 times [42]
8) 2 sc, inc, (6 sc, inc) * 5 times, 4 sc [48]
9) (7 sc, inc) * 6 times [54]
10) 3 sc, inc, (8 sc, inc) * 5 times, 5 sc [60]
11) (9 sc, inc) * 6 times [66]
12) 4 sc, inc, (10 sc, inc) * 6 times, 6 sc [72]
13 – 15) 72 sc [72] – 3 rows
We do not cut the thread, we just pull the loop so that the part does not bloom.
Set the top aside and move on to the bottom.
Bottom part (pink or pink-beige yarn):
1) 6 sc in MR [6]
2) 6 inc [12]
3) (1 sc, inc) * 6 times [18]
4) (inc, 2 sc) * 6 times [24]
5) (3 sc, inc) * 6 times [30]
6) 1 sc, inc, (4 sc, inc) * 5 times, 3 sc [36]
7) (5 sc, inc) * 6 times [42]
8) 2 sc, inc, (6 sc, inc) * 5 times, 4 sc [48]
9) (7 sc, inc) * 6 times [54]
10) 3 sc, inc, (8 sc, inc) * 5 times, 5 sc [60]
11) (9 sc, inc) * 6 times [66]
12) 4 sc, inc, (10 sc, inc) * 6 times, 6 sc [72]
SLST in the next loop, fasten and cut the thread.
We return to the details of the top.
We fold the bottom and top edges to each other. We sew them, as if continuing to crochet the upper part, while capturing the columns of the lower part.
Thus, we crochet a row of sc: 62 sc, tightly stuff the head-body with filler, another 10 sc [72].
We fix, cut the thread, hide the yarn.
You may also like Crochet Fish Amigurumi Free Pattern
Hind legs (x6):
(red yarn):
1) 6 sc in MR [6]
2) 6 sc [6]
3) (1 sc, inc) * 3 times [9]
4 – 5) 2 sc, 5 hdc, 2 sc [9]
6) 9 sc [9]
SLST in the next loop. We fix the thread, leave a long tip in order to sew the legs to the body, cut the thread. We tightly stuff each leg with filler.
All six legs are crocheted in the same way.
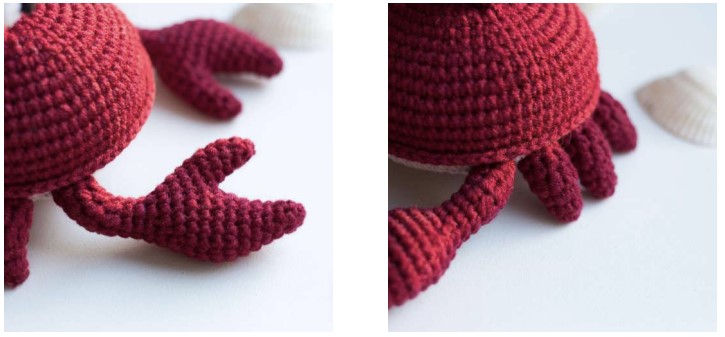
Claws (x2):
(red yarn):
In order to tie a claw, you first need to tie the first part, then the second, and then combine them into one piece.
Part 1:
1) 4 sc in MR [4]
2) (1 sc, inc) * 2 times [6]
3) 5 sc, inc [7]
4) 6 sc, inc [8]
SLST in the next loop, fasten and cut the thread.
Part 2:
1) 5 sc in MR [5]
2) 4 sc, inc [6]
3) (2 sc, inc) * 2 times [8]
4) (3 sc, inc) * 2 times [10]
5) (4 sc, inc) * 2 times [12]
6) (5 sc, inc) * 2 times [14]
7) 14 sc [14]
We combine two parts into one part:
After we have crocheted all the rows of the second part, we do not cut the thread.
We attach the first part to it and crochet:
8) 8 sc on the first part (starting from the loop after the SLST), then 14 sc on the second part [22]
Tightly fill both parts with filler.
9) 3 sc, dec, 9 sc, dec, 6 sc [20]
10) 20 sc [20]
11) (1 sc, dec) * 2 times, 5 sc, dec, 1 sc, dec, 4 sc [16]
Add filler.
12) dec, 1 sc, dec, 3 sc, dec, 1 sc, dec, 2 sc – we don’t crochet one sc to the end of the row – here there will be a new beginning of the row [12]
13) (dec, 1 sc) * 4 [8]
Add filler.
14 – 15) 8 sc [8] – 2 rows
Add filler.
16 – 19) 4 sc, 4 hdc [8] – 4 rows
SLST in the next loop, fasten the thread, leave a long tip in order to sew the claw to the head-body, cut the thread.
Tightly stuff the claw with filler to the end.
The second claw is crocheted in the same way.
Now we sew the claws to the front of the head-body (for starters, determine which part turned out to be neater, it will be in front) at a distance of 20 sc from each other.
We sew each claw in the interval from the border between the upper and lower parts of the head-body, to the 10th row of the lower part (if you count from the beginning of its crocheting). Short “fingers” should look at each other.
Then we sew the hind legs (3 on one side, 3 on the other side of the head-body).
All three legs are sewn immediately after the claws one by one, without any distance between them. Also, in the gap from the border between the upper and lower parts of the head-body, to the 10th row of the lower part (if you count from the beginning of its crocheting).
Eyes (x2):
(red yarn):
1) 6 sc in MR [6]
2) 6 inc [12]
3) (1sc, inc) * 6 times [18]
4) (inc, 2 sc) * 6 times [24]
5 – 7) 24 sc [24] – 3 rows
8) (2 sc, dec) * 6 times [18]
9) (dec, 1 sc) * 6 times [12]
Fill the ball tightly with filler.
10) (1 sc, dec) * 4 [8]
11 – 13) 8 sc [8] – 3 rows
The column obtained after the ball with filler can not be stuffed.
SLST in the next loop, fasten the thread, leave a long tip for sewing the eyes to the head-body, cut the thread.
Eyeballs – 2 details (white yarn):
1) 6 sc in MR, SLST in the first sc of the row [6]
2) 1 tch, inc in the same loop, 5 more inc, SLST in the first loop of the row [12]
We cut the thread, leaving a long tip for sewing eyeballs to the main red part.
Pupils – 2 parts (black yarn):
1) 6 sc in MR, SLST in the first sc of the row [6]
We cut the thread, leaving a long tip for sewing the pupil to the eyeball.
Now we sew the pupil on the white part of the eye, then we sew the resulting part on the side of the red base of the eye (between 3 and 10 rows from the beginning of crocheting the part).
We fix and hide all the ends of the threads.
The second eye fits in the same way.
Each eye is sewn between 2 and 6 rows from the beginning of crocheting in the middle of the upper part of the head-body.
Magical crab ideas
Crochet Magic: Bring Every Amigurumi Animal to Life
From playful amigurumi cats, dogs, and bunnies to enchanting amigurumi unicorns, amigurumi elephants, and amigurumi giraffes, our patterns let you create a world full of handmade charm. You’ll also find delightful amigurumi bears, amigurumi foxes, amigurumi pandas, amigurumi monkeys, amigurumi lambs, amigurumi pigs, amigurumi birds, amigurumi penguins, amigurumi llamas, amigurumi hippos, amigurumi dinosaurs, plus whimsical amigurumi dolls and amigurumi clowns. Each project is a chance to craft joy, learn new stitches, and share your creativity with loved ones. For endless inspiration and even more free amigurumi patterns, don’t forget to follow our Facebook page Always Free Amigurumi and join our friendly crochet community in the Facebook group to keep your crochet adventure going!
Keywords: free amigurumi patterns, crochet toys, amigurumi animals, beginner amigurumi, amigurumi dolls, crochet free patterns, crochet patterns, easy crochet


